Raw Ice Cream Sandwiches

How does one properly enjoy a hot summer eve? I vote with a fork, spoon, or fingers and something sweet. Last night I made my first ever raw chocolate cookie to use as the sandwich for banana soft serve. The great part about these raw treats is that they are made with REAL FOOD so you don’t have to worry about over-indulging. Your body recognizes it as actual food so it will digest it as such, not like the average ice cream sandwich would.

For the Chocolate Cookies you will need the following:
1 1/2 cups oat flour (toss oatmeal in a food processor and grind into a flour)
1 heaping cup dates, pitted
3 TBS coconut nectar, agave, or maple syrup
4 TBS coconut butter
3 TBS cacao powder
1 TBS water

Process oat flour. Mix with cacao powder and set aside. Mix remaining ingredients in food processor until thoroughly combined. Once a consistent paste is formed, add flour mix and blend well. With a rolling pin, spread into a thin layer and cut out cookies. Let your creativity take over and use fun cookie cutters or else use the top of a glass. Works like a charm when strapped for the proper utensils. Place cookies on a sheet and freeze for at least one hour.

Meanwhile…

Take at least 4 frozen bananas (previously peeled, cut into smaller portions, and frozen overnight) and blend well. This may take a few minutes depending how much banana you have. Add 1-2 tsp vanilla extract if desired (or maca powder for a hint of butterscotch! yum!) Place back in freezer until cookies are well set.

Once the cookies have hardened, remove from freezer and assemble your sandwiches. Eat devour immediately! Make sure to store leftovers in a sealed container in the freezer for another sweet tooth indulgence!

If you are having an extra sweet tooth, as I usually am, try adding a bit of Caramel Sauce to the mix. To whip up this easy and tasty treat you will need:

1 cup dates, pitted
1/4-1/2 cup almond milk
1 TBS raw honey, coconut nectar, or agave
1 tsp vanilla extract
pinch of sea salt

Blend well in blender or food processor. For more of a spread-like consistency use 1/4 cup of milk at first and add more if you prefer a thinner “sauce”.

>Granola Is Not Just For Hippies

>Alright. So my go-to granola recipe is awesome and blows store bought granola out of the water anyday. This granola is made sans oil- creating a less greasy and extra crunchy heavenly delight. And being homemade makes it oh so much better! Granted it is not raw… but like I mentioned before I never intend to be 100% raw and this recipe is part of the reason why.

The original recipe (adapted by Ellie Krieger) goes something like this:

3 cups old-fashioned rolled oats
1/2 C pure maple syrup
1/2 C chopped pecans
1/2 C chopped almonds
1/2 C chopped walnuts
1/4 C sunflower seeds
1/2 C raisins (optional)
1-2 TBS cinnamon
1/4 tsp salt

Mix together oats, nuts, salt and cinnamon in a large bowl. Add maple syrup and mix until evenly coated. Spread evenly on a lightly greased baking sheet and bake at 375 F for 15 minutes. After 15 mins, remove from oven and toss granola around with a spatula. Be sure to ‘unstick’ the oats that may be stuck to the pan to keep them from burning. Add raisins now if you’d like to cook them a bit. Place back in the oven for another 10-15 minutes or until lightly browned and crunchy. Careful not to let burn!

Here’s my take:
1 1/2 – 2 C oats
1/2 C chopped pecan
1/4-1/2 C chopped almond
1/4-1/2 C pure maple syrup
lots of cinnamon
few handfuls of raisins
half handful of shredded coconut
sometimes a pinch of salt

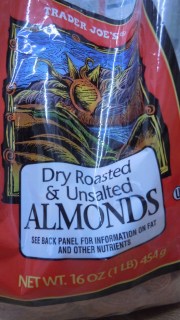
Typically I just throw whatever I have on hand in the mix. My favorites include (I didn’t even realize I bought dry roasted almonds until now. whoops! I’m a die-hard raw nut fan).

I leave out the walnuts & sunflower seeds since I prefer the combo of almond, pecan, and maple syrup without the rest. Throw in whatever sounds good to you based on taste preferences.
I throw it on a baking sheet and try not to forget about it in the oven like I tend to when baking/multitasking but it’s hard not to because your kitchen will smell AMAZING. Since I usually halve the recipe I take it out between 10 – 15 minutes to add the raisins, throw it back in for 8-10 addt’l minutes.

This morning my batch came out looking like this -tasty- but smelling even better

>Overnight Oats!!

>I’ve fallen in love with this reallllly easy and delicious way to enjoy oatmeal- one of my all time favorite foods that I’ve missed lots in the past year. Techniqually I consider this raw as you do not have to cook. So for all those folks out there who complain they don’t have enough time in the morning to prepare a breakfast before running out the door to work- worry no more! With this no cook method there is limited cleaning and minimal prep time… such a quick way to eat healthy when life seems too busy.

The easiest way to prepare these is by using an old glass jar – 8 oz. – that you still have the lid (i.e. jam jars, nut butter jar etc.). This way you can save time and energy by eating them right out of the same container you prepare them in. Add equal amounts oats and liquids. A filling amount is usually 1/2 cup old-fashioned rolled oats with 1/2 milk of your choice. I’ll add some honey or agave to give it a touch of sweetness and lots of cinnamon as I am obsessed.

SO, measure out the amount of ingredients you would like, give it all a good stir, and let it sit overnight in your fridge. In the morning, the oats will have softened in the liquid and you can add whatever you’d like to add flavor.crunch.whatever your heart desires.

Ideas for optional additions to add in the morning/before you eat:

bananas
berries
granola
chopped nuts
dried fruit
shredded coconut
nut butter
jam
cacao powder
yogurt
chia seeds
honey
extra milk

If you don’t fancy cold oats, there is always the option to heat them up a bit.